Delinquent Croissant

This sentence no verb.

About Me

My Photo
Name: Sami
Location: New York, New York, United States

View my complete profile

Archives

  • September 2005
  • October 2005
  • November 2005
  • December 2005
  • January 2006
  • May 2006
  • June 2006
  • July 2006
  • August 2006
  • October 2006
  • November 2006
  • December 2006
  • January 2007
  • February 2007
  • March 2007

BLOGS I READ

Click here to see my blogroll

KNITTERLY PUBLICATIONS

Knitty
The Anti-Craft
MagKnits
Spun Magazine

FREE GOODIES

Kyoto Fair Isle hat
Nathalie convertible hat/beret
Pemaquid Hat
Moss Stitch Cloche in Big Wool
Cloche Recipe
My desktop wallpapers
Meandering Lattice Hat Pattern
Diminishing Braids Hat Pattern
Bobble Thing Hat Pattern
Glaistig Hat Pattern
Wavelet Hat Pattern
Three scarf patterns using Manos

READER KNITS

Meg's Diminishing Braids
Sabine's Glaistig
meegiemoo's Wavelets
Christy's Wavelet
Subhuman Superwoman's Meandering Lattice

Powered by Blogger

Subscribe with Bloglines

Saturday, March 03, 2007

Yay! It's March!

I'm back! I still haven't written up any patterns yet, but I have been knitting. Starlight is now 32 rows past the joining of body and sleeves. Not much progress, but any progress is good.

Here are some pics of the Large Lattice cabled hat (too long for the mannequin, of course, but it fits me just fine):


And here is a hat made from 2+ skeins of some lovely Noro Silk Garden (color #84) that Glaistig traded me for the Pemaquid hat:


(Why yes, I do regret letting The Wibbles play with my poor, now-noseless mannequin.)

The entire hat is double-knitted, on a size 5 circular. I started with 240 stitches, decreased fairly rapidly to 180 to make the brim, and then continued straight up to the crown. I decreased 20 stitches every 3 rounds (that sounds like a lot, but remember it's double knitting, so it's really like 10 stitches) until I had 20 stitches left, then did a k2tog around, then closed it up. The brim was kind of floppy, so I stuck some millinery wire in there. It could also use a blocking, which I will do later tonight.

I really want to make another one of these! I got some mossy green semisolid Koigu Kersti for another try. This time I want to make more of a cloche shape, with less of a brim. I will also try casting on to the millinery wire instead of threading it in afterwards, because it was a b*tch and a half to get that wire in there.

Labels: FOs, Hats, Starlight

posted by Sami @ 3:23 PM  8 comments

Saturday, February 03, 2007

A Few FOs

Firstly, the short rows hat worked! I haven't written up the pattern yet - I have my scribbled notes, but I want to add one or maybe two more size options. But here's a sneak peek (sorry for the blurry):

It's easier to tell from the non-modeled photo how the crown is slanted toward the back of the head:


Next are two recipe cloches:


My new favorite closures for the recipe cloches are these rhinestone buckles I got at Les' Bon Ribbon.

The black one is for my cousin Megan. It's a 2x2 rib brim, and the main stitch pattern is "Chunky Rib Pattern" on p.170 of the Readers' Digest stitchionary. I did one and a half repeats of the pattern, ending on a 2x2 rib round. The crown decreases are 8 stitches decreased per round, in a spiral, in 2x2 rib. The yarn is Rowan Kid Classic, color Smoke. I used about one and a third skeins for both the hat and the band. The hat is 144 stitches cast on, using a size 3 needle. The band is 3 stitches cast on, then 1x1 rib, also with a size 3 needle.

The green one is for the fall collection. The ribbon looks a bit loose on the mannequin, because I sized it on myself. This one is three repeats of Barbara Walker's "Wickerwork" stitch pattern (from the Second Treasury), with a 2x2 rib brim and an 8-section spiral decrease in stockinette for the crown. The ribbon is 7/8" wide grosgrain. I cast on 96 stitches for this hat, and used a size 7 needle. The yarn is Jo Sharp Silkroad Aran (I love this yarn, BTW), color #106 "Batik," just under 2 skeins.

Labels: FOs, Hats

posted by Sami @ 3:25 PM  6 comments

Saturday, January 27, 2007

Kyoto


As I said before, I luuurve this hat.

I made up 2 extra sizes for the pattern, since size appears to be important - it fits me well, but is obviously too big for the mannequin. However, be warned that only the large size has been tested out.

The decreases may look slightly different for the smaller sizes, but should still look pretty much like this:


I definitely recommend wet blocking this hat; it was a bit puckery in places before the blocking. I didn't pin it out or anything, though - I soaked it in tepid water and Eucalan for about 10 minutes then put it on the mannequin head to dry.

Yarn
Debbie Bliss Donegal Tweed Aran (100% wool; 88m per 50g ball):
One skein color 281101 black (MC)
One skein color 281706 natural (CC)

I like this quality, but the black tweed has natural flecks and the natural tweed has black flecks. Sometimes, at first glance, this may make it look like you've made a mistake:

If that bothers you, I would consider a yarn substitution. I wonder if something like Cashsoft Aran would knit up to the same gauge.

Other Materials
Size 7, 47" Addi Turbo circular needle (as usual, I recommend Magic Loop)
Tapestry needle for weaving in ends
8 stitch markers; one different from the rest

Measurements
Gauge: 17.5 stitches and 22.5 rows to 4", after washing and blocking.
Circumference: 18"[20", 22"] for sizes S[M,L], unstretched.

Abbreviations
CDD (centered double decrease): Slip 2 stitches together as if to knit, k1, pass the 2 slipped stitches over
K1CC, for example, means knit 1 stitch with CC. Similar meanings for K1MC, P1CC, P1MC, P2MC, P3MC, and CDDCC.

Kyoto Rib
Worked in the round over a multiple of 4 stitches.
Make sure that both yarns are held to the BACK when changing colors.
Rounds 1-3: *K1CC, P1MC, repeat from * around.
Round 4: *K1CC, P1MC, K1MC, P1MC, repeat from * around.
Rounds 5-7: *K1CC, P3MC, repeat from * around.
Round 8: *K1CC, P1MC, P1CC, P1MC, repeat from * around.
Rounds 9-11: Same as rounds 1-3.
Round 12: *K1MC, P1MC, K1CC, P1MC, repeat from * around.
Rounds 13-15: *P2MC, K1CC, P1MC, repeat from * around.
Round 16: *P1CC, P1MC, K1CC, P1MC, repeat from * around.
Repeat rounds 1-16 for pattern.

Hat
With MC, cast on 80[88,96] stitches (I used the alternate cable cast-on). Work a setup row: K1CC, P1MC across. Join into a round, being careful not to twist. Use the distinct stitch marker to mark the end of the round. Work in Kyoto Rib until hat measures 5.5"[5.5",6"] tall (or desired length - the 6" length just covers my ears). Be sure to end on either Round 8 or Round 16 of the pattern.

Work marker round, following Round 1 of the stitch pattern: *Work 11[11,13] stiches, place marker, work 9[11,11] stitches, place marker, repeat from * around (omit the last "place marker," since the end of round marker will already be there).

Begin crown decreases:
"Work stitch in pattern" means that if the next stitch is a CC knit stitch, then K1CC. If the next stitch is a MC purl stitch, then P1MC. Half the time on the row after a CDDCC, you will need to K3CC. (The other half, will be P1MC, K1CC, P1MC.)

Size L only: *Work 5 stitches in pattern, CDDCC, work 5 stitches in pattern, slip marker, work 11 stitches in pattern, slip marker, repeat from * around - 88 stitches remain.

Sizes M and L only: *Work 11 stitches in pattern, slip marker, work 4 stitches in pattern, CDDCC, work 4 stitches in pattern, slip marker, repeat from * around - 80 stitches remain.

All sizes continue here:
*Work 4 stitches in pattern, CDCC, work 4 stitches in pattern, slip marker, work 9 stitches in pattern, slip marker, repeat from * around - 72 stitches remain.
*Work 9 stitches in pattern, slip marker, work 3 stitches in pattern, CDDCC, work 3 stitches in pattern, slip marker, repeat from * around - 64 stitches remain.
*Work 3 stitches in pattern, CDDCC, work 3 stitches in pattern, slip marker, work 7 stitches in pattern, slip marker, repeat from * around - 56 stitches remain.
*Work 7 stitches in pattern, slip marker, Work 2 stitches in pattern, CDDCC, work 2 stitches in pattern, slip marker, repeat from * around - 48 stitches remain.
*Work 2 stitches in pattern, CDDCC, work 2 stitches in pattern, slip marker, work 5 stitches in pattern, slip marker, repeat from * around - 40 stitches remain.
*Work 5 stitches in pattern, slip marker, Work 1 stitch in pattern, CDDCC, work 1 stitch in pattern, slip marker, repeat from * around - 32 stitches remain.
*Work 1 stitch in pattern, CDDCC, work 1 stitch in pattern, slip marker, work 3 stitches in pattern, slip marker, repeat from * around - 24 stitches remain.

From here on, all stitches will be in CC only.

*K3, slip marker, CDD, slip marker, repeat from * around - 16 stitches remain.
*CDD, slip marker, K1, slip marker, repeat from * around - 8 stitches remain.

Cut CC yarn, leaving a tail. Thread the tail through remaining stitches and pull tight to close. Cut MC yarn also. Weave in ends.

I will end with a bonus innards shot:

Labels: FOs, Hats, Kyoto

posted by Sami @ 12:46 PM  2 comments

Friday, January 19, 2007

Nathalie Convertible Hat

Worn as a beret:


And as a hat:

Yarn: Muench Naturwolle, 2 skeins. I can't remember the name of the colorway, and I lost the ball bands.

Needles: Size 9 and 10 47" Addi Turbos.

Pattern:
With #9, CO 60 stitches using the alternate cable cast-on. Join into a round and work in k1, p1 ribbing for 3.5". Switch to larger needle and work one more round of ribbing. Work increase round: Kfb into each P stitch - 90 sts total. Work k2, p1 rib for 3 rounds. Increase again: Kfb into each of the second knit stitches - 120 stitches. Work in k2, p2 rib for 3-3.5". Decrease: (K2, p2, k2, p2tog) around - 105 sts total. Work in patt for 3 rounds. Decrease again - (K2, p2tog, k2, p1) around - 90 sts total. Work in patt for 3 rounds. Decrease: (K2, p1, k2tog, p1) around - 75 sts. Work in patt for 3 rounds. Decrease: (K2tog, p1, k1, p1) around - 60 sts. Work in k1, p1 rib for 3 rounds. Commence final decreases: Divide sts into 6 groups of 10. SSK the first two stitches of each group together and work the rest of the stitches in patt; do this until 12 sts remain. Cut yarn, leaving a tail, and weave the tail through the remaining stitches. Pull tight to close. Weave in ends.

Comments: I have kind of a big head (22.5" around). As a hat with the turned-up brim, the fit is perfect. As a beret it's just a little bit looser than I would have liked. If I made another one for myself, I would CO 4 fewer stitches. If you have a smaller head than I do, I would definitely recommend reducing the initial stitch count by two or three multiples of 4 stitches.

Labels: FOs, Hats

posted by Sami @ 11:59 PM  0 comments

Saturday, January 06, 2007

... And, First FO of 2007

The Pemaquid hat:
(Color is truest in the closeup photo.)


(Like my new hat model?)

I used 2 skeins of Pemaquid from The Fibre Company, purchased at Webs. Man, I love this yarn. It has the sproinginess and non-itchiness of merino, but it feels even butterier. It's expensive, but for something small like a hat, it is totally worth it.

Needles: Sizes 9 and 10 47" Addi Turbo circulars. I highly recommend Magic Loop for hats in general, but especially for this one, because the decreases are very fast, and it's important to get your hat the right length.

Pattern
With #9 needle, CO 60 stitches. (This fits my 22.5" head, although it also appears to fit my mannequin, who has only a 20.75" head. The moss stitch cloche, by comparison, hangs over her nose. If you still want to adjust, add or subtract a multiple of 4 stitches, and the basic pattern will be the same). Join into a round, and work k2, p2 rib for about an inch. Switch to #10 needle.

Work increase round: (K2, p1, M1, p1) around - 75 stitches (or 5/4 of your CO amount).

Work in Furrow Rib (see below) until hat is the right length, ending on Round 2 of the pattern. What is the right length? Try it on. Placing the bottom where you want it to go (I like my hats to cover my ears, but some people prefer half coverage or even a beanie shape where the ears are not covered at all), the top should come about an inch short of meeting at the top of your head. For me, the right length was just under 8 inches.

Work Decrease rounds:
Round 1: (K2, slip 2 together as if to knit, k1, p2sso) around - 45 stitches total (or 3/4 of your CO amount)
Round 2: K all stitches. When you get to the marker, remove it, k one more stitch, and replace it.
Round 3: (Slip 2 together as if to knit, k1, p2sso) around - 15 stitches (or 1/4 of your CO amount)
Round 4: K all stitches.

Cut yarn, leaving a tail. Thread tail through remaining stitches and pull tight. Weave in ends.

Furrow Rib
Worked in the round over a multiple of 5 stitches.
Slip all stitches purlwise with yarn in back.
Round 1: (Sl 2, k3) around
Round 2: (K2, p3) around
Repear rounds 1 and 2 for pattern.

Labels: FOs, Hats

posted by Sami @ 7:42 AM  3 comments

Friday, January 05, 2007

Last FO of 2006

Here she is, the Moss Cloche:


(Color is truest in the one where you can see the camera.)

This was a Cloche Recipe cloche. I used two skeins of Rowan Big Wool in color Cassis (#24, I think), and 47", size 11 Addi Turbo circular needle. (Side note: I always use Magic Loop for hats, so I can try them on as I go.) I cast on 60 stitches to begin with, and followed the Recipe. For the decreases, I divided the stitches into 5 groups of 12 and SSK'ed the first two stitches of each group on every round. The band is 5 stitches in K1, P1 rib with a chain stitch selvedge (exactly the same as for Glaistig, but without the bobble).

I'm going to have to make another one of these for the store. I can't in good conscience use this one because I have literally been wearing it EVERY DAY. I'm kind of over the spiral decrease thing (it's been a while since I leafed through Knitting Nature), so for version 2 I'll be using the centered double decrease - sl 2 tog as if to k, k1, p2sso - instead. Well, probably. I want to swatch(!) for that first. I like that decrease for stockinette, but I haven't tried it yet for moss.

Labels: FOs, Hats

posted by Sami @ 7:36 PM  2 comments

Saturday, December 16, 2006

Starlight

First, good news. Last Sunday I attended a Barbara Kerr finishing workshop at The Point - a birthday gift from my parents. Boy, did I learn a lot. There are some things that it's really difficult to learn from books, and finishing is one of them. Not only did I finally learn how to seam properly, I also learned how to do short-row shaping for sweater shoulders, how to graft in a sleeve, and a bunch of other stuff.

Now, the bad news - I decided to frog my Demi sleeve and start over, this time adding a stockinette stitch to each edge. It will make finishing easier and better looking, and I wasn't so far along (about 2 inches more than in the last photo I posted) that ripping was a disaster.

I haven't actually done the ripping yet, since I have raging ripaphobia. I will stall FOREVER before ripping something out, often completing a project or two between the decision to rip and the actual ripping. (Wondering what happened to my Pemaquid hat? I didn't like the way the decreases were going, so I need to rip back to before I started them - STALL.)

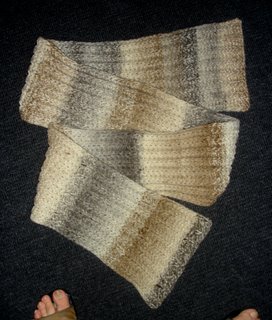
So instead of ripping out the Demi sleeve, I made a scarf and started on Starlight. The scarf is just a simple cartridge-belt rib scarf out of some yarn my parents got me from Argentina - 100% Patagonian wool:

I thought it was variegated, but it turned out to be self-striping:


And this is what I've got so far on Starlight:

The yarn is my birthday Ella Rae Classic. It's a much deeper red than it looks in this picture, about halfway between red and burgundy. I'm going to cut off the pink cast-on yarn at the end, put the live stitches on a needle, and do two more rows of garter stitch and a picot bind-off for edging. It should look similar enough to the edging in the pattern, which is knitted separately and then sewn on.

I'm working both sleeves at once, which is what I'm going to do on Demi when I get around to restarting it. The markers are just there to help me remember which direction I'm working in - I get distracted when I knit and watch movies at the same time.

I'm not quite getting gauge - 28 stitches and rows to 4" instead of 30 - but I figure a little extra ease and length is probably a good thing, especially since I am not adding extra stitches for hippage and I am making the size for my real chest size (which is significantly smaller than my hip size). I am increasing more frequently on the sleeves, though, since I don't want those to be too long.

Labels: FOs, Starlight

posted by Sami @ 7:09 PM  3 comments